Thursday, April 17, 2014
Vegan Recipes Index page 2

Vegan recipes.
All food recipes on this page are fully vegan and free from all animal products.
Click on the link next to the picture for a full vegan step-by-step picture recipe.

Vegan Toffee Cake Recipe

Vegan Bakewell Slice Recipe

Vegan Butterbean Hummus Recipe

Vegan Peach Cream Cake Recipe

Vegan Lasgana Recipe

Vegan Jam Slice Cake Recipe

Vegan Mushroom Pie Recipe

Vegan Chocolate Chip Cookie Recipe

Vegan Sponge Cake Recipe

Vegan Brown Rice Biscuits Recipe

Vegan Strawberry Tart Cake Recipe

Vegan Carrot Cake Dessert Recipe

Vegan Shortcrust Pastry Recipe

Vegan Baked Onion Bhaji Recipe (with full video recipe)

Vegan Whipped Cream Recipe

Vegan Spiced Cookies Recipe

Vegan Cinnamon Swirls Biscuits Recipe

Vegan Vegetable Stir Fry Recipe (with full video recipe)

Vegan Toffee Sauce Recipe
See more vegan recipes :
Vegan recipes page 1
Vegan recipes page 3
Vegan recipes page 4
Vegan recipes page 5
Keep logging on to Jeenas Kitchen for new food recipes.

The Magic of Puff Pastry
 One video recipe I plan on tackling soon is puff pastry. This very special dough is readily available in our grocery stores frozen foods case, but its a recipe that any foodie must try at least once.
This is from Vah-Chef, Sanjay Thumma, who does a great job explaining the process. I will do the recipe in US measurements, so dont worry about converting the metric measurements he gives.
If youve tried to make puff pastry yourself, Id love to hear your experiences, and also pass along any recipes you found successful.
By the way, Ill be flying back to San Francisco on Tuesday, so things should be returning back to whatever normal is on this blog. If Ive not responded to a comment or email, Ive either not had time, or simply missed it -- so try again. Thanks and enjoy!
Photo (c) Flickr user foooooey
Wednesday, April 16, 2014
More Delicious Than It Sounds Garlic Shrimp Pasta

I had a hard time coming up with a spunky and creative title for last nights dinner that would draw you in and compel you to stop what you are doing and read this entry. Oh, and the picture I took does not do it justice either! So Ill give you the basics, a title, the ingredients, a reasonable photographic representation and your imagination will have to make up for my shortcomings.
Normally, I must admit, I would have purchased U.S.A. wild caught raw shrimp and cleaned and cooked them myself. However, I had a few shrimp left over from a bag of precooked flash frozen shrimp I bought over the holidays to make a shrimp dip for a Christmas Eve hors doeuvre. That being said, I took about ten or so frozen, peeled, precooked shrimp from the freezer and thawed them in a bowl of cold water for about 10 min. While the shrimp were thawing I cooked and drained the pasta, spaghetti for this dish, and removed from the refrigerator the compound butter, which will serve at the "sauce", I made earlier in the day.
In a bowl, combine 2 tablespoons of room temperature butter, 1 tablespoon of olive oil, 1 large minced clove of garlic (or more if you dont have a date or better yet if your going to eat together), 1 teaspoon lemon zest, 1 minced red chili pepper (red pepper flakes could also be used), 1 tablespoon chopped fresh parsley and sea salt and pepper to taste. Refrigerate until your ready to cook the shrimp.
Heat a large skillet over medium heat. Add 1 nice sized dollop of the garlicky compound butter to the pan (do not let it burn). Introduce the shrimp to pan and cook just until warmed through. Remember my shrimp were already cooked so they just needed to be heated. You could certainly prepare this recipe with raw shrimp as well, just cook them until pink and opaque which should not take more than 5 minutes. When the shrimp are sufficiently warm, add splash of white wine just to create a little sauce, not leave the shrimp floating in a pool. Add the pasta and combine. The pasta will absorb the wine and lend a most delicious flavor. Again, cook just long enough to warm everything through. Then, turn off the heat and add a final bit of the compound butter to coat the shrimp and pasta. Serve hot!
Please let me know your thoughts and ideas for your favorite pasta dishes. Perhaps we will inspire some else to fix a home cooked meal for themselves and their family!
SANDRAS SUPERBLY MOIST BANANA NUT and RAISIN BREAD
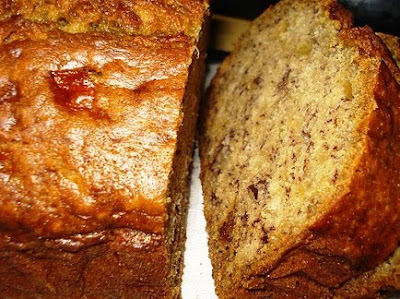 |
| Over the years Ive made many, many variations and this is my absolute favorite to date... |
Prep: 10 mins. |
Bake: 1 hr.
Posted by Sandra
INGREDIENTS
2 cups all-purpose flour
1/2 teaspoon baking soda
1 teaspoon double-acting baking powder
1 cup white sugar
1/2 cup brown sugar
1/2 teaspoon salt
2 eggs
1 teaspoon freshly grated orange zest
1/2 cup butter (1 stick), at room temperature
2 cups “ripe” bananas, cut into very small chunks (about 3 large)
1 teaspoon vanilla
2 teaspoons cinnamon
½ teaspoon nutmeg
3/4 cup of milk
1 cup combination of cup chopped pecans, and raisins
--(or craisins, or other dried fruit, or brand of nuts, also see “Tip”)
--Cinnamon/sugar for sprinkling on top
METHOD
Preheat oven to 350 degrees. Prepare a loaf pan sprayed with baking flavored oil.
Sift together the flour, baking soda, baking powder, and salt into large bowl.
In a medium bowl, cream together the sugar and butter. Beat the eggs slightly in another medium bowl, and add to the creamed mixture, mixing to combine. In the same medium bowl, add the chopped bananas, and then add to the creamed mixture. Add the vanilla, cinnamon, nutmeg, and orange zest and beat, just until combined.
Mix in the sifted dry ingredients until combined, then stir in milk and nuts (or your preferred additions, but do not exceed ½ cup total).
Place the mixture into the prepared loaf pan, and bake for 30 minutes, remove and sprinkle with top with cinnamon/sugar, and continue baking for 30 more minutes, until the top is brown and a toothpick inserted in center comes out clean.
Remove from oven and place loaf pan on its side for 10 minutes, and then place on a cooling rack and cover loaf with a clean kitchen towel to cool for 10 minutes before spreading slices with butter or cream cheese, and a hot cup of coffee or tea, or a cold glass of milk. – Enjoy!
~~~~~~~~~~~~~~~~~~~~
Tip: If you use frozen cranberries or blueberries, once thawed if there are any juices present be sure to drain first through a colander or sieve, although maintain the 1-cup quantity.
Tuesday, April 15, 2014
Muttai Kothu Parotta Egg Kothu Paratha
 |
| Muttai Kothu Parotta |
Ingredients
Malabar Parotta/ Plain Parotta( cooked)- 8 nos
Eggs- 4 nos
Onion large( minced)- 1 no
Malabar Parotta/ Plain Parotta( cooked)- 8 nos
Eggs- 4 nos
Onion large( minced)- 1 no
Tomato large( minced)- 1 no
Green chilli( broken)- 2 nos
Ginger and Garlic paste- 1 tbsp
Curry leaves- few
Red chilli powder- 1 tsp
Turmeric powder- 1/2 tsp
Salt- 1 tsp
Oil- 4 tbsp
Any non vegetarian gravy or chalna- 1 cup( simple chicken curry, mutton curry etc)
Cinnamon- 1/2"
Cloves- 4 nos
Cardamom- 2 nos
 |
| Egg Kothu Paratha |
Method
Tear and break Parotta into tiny pieces.
Beat the eggs until frothy and set aside.
Heat oil in a flat bottom pan, when oil is hot add the cinnamon, cloves and cardamom.
Beat the eggs until frothy and set aside.
Heat oil in a flat bottom pan, when oil is hot add the cinnamon, cloves and cardamom.
Fry the spices until the aroma rise.
Add the onions, curry leaves, green chilli and fry until onions turn brown.
Now add the ginger-garlic paste to the onions and fry until the raw smell leaves.
Add the tomatoes and saute until tomatoes are mashed and cooked.
Add red chilli powder, turmeric powder and salt, cook for few more mins.
Reduce the heat to medium, make a well in the center of onion mixture, add some oil in the center and add the beaten egg to the center of pan.
Increase the heat and fry the egg until its scrambled, now bring the onion mixture and cooked eggs together and mix well.
Add the non vegetarian curry and Parotta pieces to the pan.
Stir fry the Parotta pieces until the curry and onion mixture is well blended with Parotta.
Now start mincing the Parotta pieces with Dosa ladle, fry until the Parotta is finely minced and Kothu Parotta is dry.
Serve hot Muttai Kothu Parotta with Chicken Chalna and Onion Raitha.
 |
| Kothu Parota |
Dry Aging Steaks at Home – The Final Chapter I Think It Worked
 Heres the final post in the dry-aging steaks at home saga. What follows is my honest opinion on the results, as well as a fairly pointless video showing me finishing the project.
Admittedly, there isnt much to learn from the video, but since some of you seemed genuinely interested I figured youd want to see the finale.
By the way, if you read my last post you know Im in Vail, CO being wined and dined by RockResorts, so I did this voiceover in the hotel room with a voice you only get at 8,000 feet.
When I first considered how to test my dry-aged steaks, I was thinking of the standard "taste it with an un-aged steak and compare" method. Seemed logical, but then I thought of something even better -- why not taste it next a higher-grade, professionally dry-aged steak?
 This would be the true test. Would my steaks have the same taste and texture as the real deal? As Ive already stated in previous blogs, theres really no debate about whether a dry-aged steak is a superior eating experience to a conventional steak, so it seemed anticlimactic to taste them side-by-side just to say, "hmmm…the steak aged two-weeks is more tender and flavorful." What a shocker.
So, instead I bought a thick, well-aged steak from the same butcher, using the same beef as the whole loin Id bought. Not only that, but I decided to make it even more of a challenge and bought "Prime" grade steak. The battle was on. Would my home-aged, "Choice" grade steaks match up against a "Prime" grade steak aged by an expert?
First of all, the Drybags clearly worked exactly as advertised. The surface was hard and leathery, as you can see in my short video, and the meat had definitely undergone a slow, controlled drying process.
 The loin smelled exactly like the aged steak Ive worked with in the past, which is to say it had a faint, meaty musk that I would describe, as strange as it may sound, as very pleasant. After trimming off the hard, dried exterior, the color of the meat was a beautiful deep, dark red. As promised the bag allowed moisture to escape, yet sealed it from the outside environment, so no spoilage occurred.
The steaks were coated with freshly ground black pepper and allowed to come to room temperature. After a generous application of kosher salt, they were cooked over charcoal to medium-rare (internal temp of 130 degrees F). After resting, I sliced up the "Prime" dry-aged steak from the butcher. We tasted, and it was predictably fabulous.
We then cut into my steaks, and Im happy to report the results were pretty impressive. I found the meat tender and flavorful, and comparable to the professionally aged beef. Lenny and Denise from ChezUs joined us to assist in the tasting, and along with my wife Michele, we had four experienced palates on the case.
 The final verdict was; two of us though the steaks were comparable, one thought the quality of the butchers steak was slightly better, and one definitely preferred the home dry-aged steak more.
So, there you have it. As to whether the Drybags are an effective way to age your own steaks at home, the answer is a definite yes. Should you get one? I cant answer that -- these are matters of taste -- while I feel strongly dry-aged steaks are better, you may not.
If you love dry-aged steak, and want to eat it more often, without the expense of the steakhouse it may be a good investment. Its worth noting that it also comes with smaller bags for regular vacuum packing, so that could factor into your decision.
 Thanks to Drybag Steak for letting me test the product out. It was a fun experiment, and the final product was quite luxurious.
If you want more info, or have specific questions, please refer to the Drybag Steak website.
Professional food bloggers do not live by old beef alone! In addition to the steaks you see here, the rest of the menu included:
- Frog Hollow peach, basil, and mozzeralla fresca crostini
- Prosciutto and argula on baguette
- Roasted cipollini onions
- Watercress salad with marinated early girl tomatoes
- Sottocenere truffle cheese and lobster mushroom pomme dauphinoise (I filmed this, so stay tuned for that video soon!)
- Two sauces: classic Bordelaise sauce, and not so classic "Béarnaise" aioli.
First Three Photos (c) ChezUs
Jeenas Wholewheat Naan Bread
This recipe worked a treat for me today. It is wholewheat naan bread that is as soft and fluffy as a white naan. It is healthy to eat with currys,stews, soups or even opened up with a delicious filling added. This Wholewheat Naan Bread Recipe is simple and quick to make so why not give it a try. :)


You should be left with some bran left over.

Do not discard the left over bran. Put it to the side for later.


Add your bran and stir.
Read More..
approx 1/2 to 3/4 Sachet Yeast
1/4 tsp Salt
1 tsp White Sugar
Splash Milk
Hot Water
7-8 Tbsp Wholewheat Flour
3 Tbsp Plain Flour
3 Tbsp Yogurt
1/2 tsp Bicarbonate Soda
3 Tbsp Yogurt
1/2 tsp Bicarbonate Soda
Put a splash of cold milk into a cup.
Stir in your sugar then add enough hot water to warm your milk up.(you wont need much hot water here)
Add your yeast, stir then leave for a few minutes while you prepare your other ingredients.
Sieve your wholemeal flour into a bowl.
You should be left with some bran left over.
Do not discard the left over bran. Put it to the side for later.
Add your plain flour, bicarbonate of soda, salt and stir.
Add your bran and stir.
` 
By now your yeast should have fluffed up.

Take another cup and put your yogurt into it with a tiny splash of hot water to warm through the yogurt. Now add your yogurt to your flour. Also Gradually add your yeast mixture and stir well.


Grease your bowl then over and leave for 30 minutes or until your dough has doubled in size. If your room is quite cool make sure you leave it to rise in a warm place.

Once your dough has doubled in size it should feel soft and light and fluffy.

By now your yeast should have fluffed up.
Take another cup and put your yogurt into it with a tiny splash of hot water to warm through the yogurt. Now add your yogurt to your flour. Also Gradually add your yeast mixture and stir well.
You may need to gradually add more flour if it is too sticky. Knead your dough for a few minutes preferably 5 minutes.
Grease your bowl then over and leave for 30 minutes or until your dough has doubled in size. If your room is quite cool make sure you leave it to rise in a warm place.
Once your dough has doubled in size it should feel soft and light and fluffy.
Shape your breads with your hands and place onto a greased and floured baking tray. Put into a hot oven at approx 220C for 10 minutes or until golden.

For a more pita style bread roll out with a rolling pin into a thinner shape.

Enjoy Jeenas Wholewheat Naan Bread with soup, curry, stew or fill it with your favourite yummy filling! I opened mine up and ate it with some leerdamma cheese and it was delicious.

For a more pita style bread roll out with a rolling pin into a thinner shape.
Enjoy Jeenas Wholewheat Naan Bread with soup, curry, stew or fill it with your favourite yummy filling! I opened mine up and ate it with some leerdamma cheese and it was delicious.
Subscribe to:
Posts (Atom)