Tuesday, May 20, 2014
Eral Kathirikkai Murungakkai Kuzhambu Prawns with Brinjal and Drumstick

Since cleaning prawns is a tough job, I always buy prawns from the lady who brings on her head home. I buy from her for the past 20 years. She as a practice cleans the prawns and takes out the kudal i.e., a long black thread like thing from its stomach. If that is not taken out it will lead to stomach pain. After she cleans and goes, I will make sure that she has taken it out from all the prawns. This Sunday as it is holiday time the town looks deserted as many have gone to their native place and she could not sell her prawns fully. She compelled me to buy more and was telling different recipes. I always make the prawn curry which my younger one loves. So I have never thought about an alternate recipe and that too kuzhambu. She said make vadai adding surakkai. I said I don’t use surakkai. Then she said radish and a handful of prawns will make yummy gravy. The smell of radish also will make my younger one run away from the dining table. So I thought I will make kuzhambu using one brinjal and one drumstick with little small onions and garlic. She said that also will be good and managed to sell ½ kg more of prawns.
The taste of the kuzhambu has no words to describe. My husband who always tries to make fun of my cooking somehow couldn’t resist telling that the dish is one of the best that I have cooked. My younger one who is very choosy also fell for its taste and said if I write a blog on this she will be the first to write the comment as she has tasted it. There was not a drop of gravy left over after dinner.
Those who live abroad may find it difficult to get fresh drumstick. They can try with radish or brinjal alone. A handful of prawns are enough. 100 to 200 Gms of cleaned prawns will be enough.
Ingredients

Prawns-100 Gms (cleaned) more can be added if desired
Brinjal-1
Drumstick-1
Small onion-20
Tomato-1
Garlic-20 pods
Curry leaves-little
Sambar powder-2 teaspoons
Coriander powder-2 teaspoons
Turmeric powder-1/2 teaspoon
Tamarind-gooseberry size
Procedure
In a kadai in 2 teaspoons of gingerly oil or cooking oil season the gravy with a teaspoon of mustard seed and little vendayam and curry leaf. Sauté the chopped onions nicely then the garlic and finally the tomatoes. When they are sautéed well add the sambar powder, coriander powder and turmeric powder and sauté well. Now add the brinjals and sauté in medium fire for 5 minutes. Meanwhile in 2 cups of water mix the tamarind and the salt needed .Once the brinjals are sautéed well add the tamarind salt water. Reduce the flame once the gravy starts boiling. Add the drum stick also. Cook for 10 minutes in low fire. Make sure that the brinjals doesn’t get overcooked. If so reduce the cooking time. Now add the prawns and cook for 5 more minutes. Prawns do not need much time to cook. Let the gravy stay for at least 2 hours before serving for best taste.
The gravy should not be very watery. It should be like puli kuzhambu.

Wednesday, May 14, 2014
Grilled Salmon with Maple Soy Glaze

Grilled Salmon with Maple-Soy Glaze
1 (1 1/2-2 lb.) skin-on salmon fillet, 1 1/2 in. thick
1/3 c. + 1/4 c. maple syrup, divided
1/3 c. + 2 T. soy sauce, divided
Pepper
Lemon Wedges
For the glaze: in a small sauce pan, bring 1/4 c. maple syrup and 2 T. soy sauce to a simmer over medium-high heat and cook until slightly thickened, about 3-4 minutes.
Measure 2 T. of the glaze into a small bowl for serving and set aside.
For the salmon: whisk the 1/3 c. soy sauce and 1/3 c. maple syrup together in a 9x13 baking dish. Use a sharp knife to remove any fat from the belly of the salmon and cut fillet into 4 equal pieces. Place fillets skin side up in baking dish (dont coat the skin with the marinade) and refrigerate fish while preparing the grill, at least 20 minutes.
For a gas grill - turn all burners to high, cover, and heat grill until hot, about 15 minutes. For charcoal - open bottom vent completely. Light large chimney starter filled with charcoal briquettes. When top coals are partially covered with ash, pour 2/3 evenly over grill, then pour remaining coals over half of grill. Set cooking grate in place, cover, and open lid vent completely. Heat grill until hot, about 5 minutes.
Clean cooking grate, then repeatedly brush grate with well-oiled paper towels until black and glossy, 5-10 times (dont skip this or it will stick!). Remove salmon from marinade and season with pepper. Place fish flesh side down on grill (hot side if using charcoal) with fillets diagonal on grate. Cook (covered if using gas) until grill marks form, 1-3 minutes. Flip fish, brush with glaze, and cook until salmon is opaque about halfway up thickness of fillets, 3-5 minutes.
Brush fillets again with glaze, then flip and move to cool side of grill (if using charcoal) or turn all burners down to medium-low (if using gas). Cook until center is translucent (for medium-rare), 1-3 minutes longer. Cook a few minutes longer for more well done.
Transfer fillets to a serving platter, brush with reserved 2 T. glaze, and serve with lemon wedges.
Source: Cooks Illustrated Cookbook
Monday, May 12, 2014
Moms Chicken Soup with Cavatelli

A couple of days ago I posted about the chicken and potatoes I made in the oven. In the package of chicken that I bought had a whole chicken that was cut up. I used part of it in my roasted chicken dish (enough to feed two) and the rest of the chicken I used to make this soup. I had a large chicken breast, two wings and a thigh and just to make sure I had enough meat I added an extra chicken breast that I had. I should have listened to my mother and not used so much water because since I didnt have a whole chicken the broth was a little light and bland. No big deal, I threw in a few chicken bouillon cubes. Im not going to give you an exact recipe for this but I think youll get the idea.
Add chicken (with bone and skin) to pot with enough cold water to cover. Leave the skin on but if there is a lot of excess skin or fat just trim that off. To the pot add whatever veggies you like and you dont have to get particular about dicing. I cut them into large chunks. I just used two tomatoes, carrots, onion and celery but you can use leeks, mushrooms, garlic, whatever you like. I added bay leaves but you can add parsley or thyme also if you like it. Let it come to a boil and then reduce to a simmer. Let it cook until chicken is cooked through (approx 1 hour, depending on amount of chicken). Remove chicken to a dish and let cool. Taste soup for seasoning. Add salt, pepper and if you think it needs a richer taste add bouillon (before you add the salt). When chicken is cool enough to handle shred with two forks (or your fingers) or dice into small pieces. I prefer it shredded because thats how my mother always did it. I used my immersion (stick) blender and blended all the veggies (except for one lone carrot...oops!) but you dont have to do that. You could have cut your veggies smaller and left them whole. Add shredded chicken to the pot. In separate pot cook pasta or rice. I used cavatelli (we pronounce it gah-vah-deel - dont ask, we just do!) and that can be found in the frozen section with the ravioli and tortellini. Ive heard this suggested somewhere and called "Italian chicken and Dumpling soup". I wouldnt call this that because it wasnt thick enough for that but you could certainly make a roux and thicken it up. Anyway, Im getting distracted. If you are only making a small amount of soup you could cook the pasta or rice right in the pot with the soup. I made a large amount so I could freeze it and I didnt want the pasta to get mushy.
It turned out delicious. I definitely recommend using the cavatelli but they are larger than most pasta that I would normally use and so one package was just enough but I would have liked a little more. Maybe we just have big appetites!


Sunday, May 11, 2014
Thengai Paal Kanji porridge with coconut milk


Saturday, May 3, 2014
Coffee made simple with Oxo Good Grips and Douwe Egberts

We love our coffee although we tend to go for tea first thing and start on the coffee for elevenses and then again after dinner in the evening.
A recent survey by OXO shows that 6 in 10 of us prefer instant to ground coffee because of the hassle ground coffee poses, not just in preparation but in cleaning up afterwards too. That was until OXO took away all the hassle with their new French Press.
The French Press (£35) is a modern twist on the traditional cafetiere. Housed in a sturdy stainless steel and glass carafe, the innovative ladle ‘the groundskeeper’ catches and contains ground coffee in a jiffy, removing the used grounds in one simple step.
For optimum brewing and the perfect cup every time, simply add hot water to your ground coffee using the measurement markings for guidance; stir, steep, plunge and pour. It can serve up to 8 cups, so when your friend pops round for a coffee, no need to re-brew.
To clean forget banging, scooping or scrubbing; simply lift the groundskeeper out of its carafe, wash and drip dry.
I was fortunate to be able to test-drive the Oxo Good Grips French Press along with a selection of Douwe Egberts coffee.

House Blend: for those who want a delicious ground that tastes perfect every day this smooth, full bodied European-style coffee is prepared with a classic blend of the finest beans. (Strength 3)
Café Milano: when only a traditional Italian-style coffee will do, this smooth, laid-back blend with a hint of spice evokes the flavours of Milan and is perfect to relax and escape with. (Strength 3)
Fired Up: for those who love to savour a rich, intense coffee this powerful, espresso-style blend is created with dark-roasted beans to bring out the delicious, intense flavours of spice and chocolate. (Strength 6)
We found the Fired Up coffee a bit too bitter and strong for us, so we made our own blend, mixing it with the House Blend worked rather well for us.
Douwe Egberts have put together 10 top tips for making great coffee in the French Press and Ive added my comments!
Warm your OXO French Press: You wouldn’t put hot food on a cold plate, so dont put hot coffee in a cold French Press. Pre-heating your French Press with boiling water keeps your coffee hotter for longer and improves the flavour. A cold French Press will add bitter flavours to your coffee. This is definitely a good tip, we still found that the coffee cooled more than in our filter coffee maker which has a heating element in the base.
•Let your coffee bloom’: When you add your coffee to the French Press, add only a little hot water first, just to cover the coffee, then stir before adding the rest. This allows the coffee to bloom releasing all the trapped aromas. No strong feelings about this.
•Stir in a cross pattern: When stirring your French Press, stir in a cross pattern rather than round and round. This ensures all the coffee grounds are agitated and gain maximum exposure to the water. Again, I couldnt really taste any difference.
•Never use boiling water to make coffee: This burns the coffee grounds and gives the coffee a sour, burnt taste. Once the kettle has boiled, leave it for one minute, which should allow it to cool to an optimum brewing temperature of approximately 90/95 degrees. We NEVER do use boiling water whether its ground coffee or instant coffee.
•Add lemon or salt: If you drink your coffee black, adding a slice of lemon to the French Press with a lightly roasted coffee will bring out the citrus notes in the coffee. Similarly, adding a pinch of salt to a French Press of dark roasted coffee will highlight the dark caramel and nutty flavours. Still to try this sounds intriguing.
•Wait! Once youve filled and stirred your French Press, leave it to brew for at least three minutes. After that, break the crust to let most of the grounds sink, scoop any remaining grounds off the top, put on the lid, plunge and enjoy! Absolutely!
•Use the groundskeeper from your OXO French Press: Once youve finished your coffee, you can remove the grounds with no mess using the OXO groundskeeper, and re-use them for all sorts. Coffee grounds make great fertiliser and if youre feeling brave, can even be added to shower gel as an exfoliant! Mine goes into the compost!
•Keep your French Press clean: Coffee is full of oils, which is why it has such a special aroma, but the oils also get everywhere, so make sure you clean your French Press after every brew otherwise the oils left behind can go stale and taint your next coffee. This is a good tip, but it would have been better if the French Press was dishwasher safe.
•Don’t wait! After your first cup, dont leave your French Press for too long before drinking the rest of your coffee. Coffee (like all hot drinks) will go stale if left brewed for too long. Any more than an hour and youd be better off brewing fresh, to get the best cup! This is a top tip, it will cool quickly as well as becoming slightly bitter and stewed.
•Take the plunge: When you plunge, make sure you plunge straight down and not at an angle otherwise you will end up with coffee grounds in your coffee cup. We still found a few coffee grounds, although cleaning the French Press was much easier than with other cafetieres.

OXO UK have a French Coffee Press up for grabs on their Facebook Page it runs until this Thursday, 21st March 2013.
Friday, April 25, 2014
Pasta with Spring Spinach Pesto
As soon as I stopped posting, the weather improved and weve been in the garden almost non-stop ever since. We are still way, way behind where we would like to be. Ill post about that a bit later.
Meanwhile, this is something Ive been playing around with this spring. As you see, its pretty flexible. Almost all the measurements are fairly approximate, and you should emphasize whatever elements you like. In particular, the cheese you use will make a difference. Ive mostly been using some nice creamy chevre, but any soft cheese should do. The spinach gives it more body than a regular pesto, so it can go on thicker too. Some sliced asparagus added to the pasta at the end of the cooking would go well.
I would have liked to use some wild leeks (ramps) in this, but I havent seen any around here this spring. I haz a sad; the world is plainly going to hell in a handbasket. I know, I know; shut up already, and eat.
4 servings
20 minutes prep time

450 to 500 grams (1 pound) dry pasta
6 to 8 cups spinach
1 1/2 to 2 cups chopped onion greens
2 tablespoons butter
1/3 cup sunflower, pumpkin or nut seeds
1 to 2 tablespoons rubbed basil
1/2 teaspoon crushed black peppercorns
salt as required - depends on the cheese!
150 to 200 grams soft creamy cheese
1/4 to 1/3 cup light cream or chicken broth
a little grated Parmesan to serve over the top
Put a large pot of salted water on to cook for the pasta.
Wash and pick over the spinach, and rinse it again. Drain well, and chop coarsely.
Wash and trim the onion greens. You can use onion tops, wild leeks, garlic tops, leeks, chives; whatever greeny oniony stuff you can get your hands on. Again, chop them coarsely.
Heat the butter in a large skillet, and cook the onions until soft. Add the well-drained spinach and cook it down. Meanwhile, put the basil and cheese into the bowl of a food processor. When the spinach is soft and completely wilted, add the spinach and onions to the food processor, and whizz until well chopped. Add the cheese, and process again. Add the cream or broth, to make a loose, flowing but not liquidy sauce. Taste, and adjust the salt.
Toss the cooked, drained pasta with the sauce. If you are cooking capellini, it should not go into the boiling water to cook until the sauce is ready. If you are cooking regular pasta, done in the 9 to 11 minute range, the pasta should go in to cook as soon as the onions go into the pan with the butter.
Last year at this time I made Pizza with Asparagus, Mushrooms, Fiddleheads & Ramps, and Fried Onion Rings.
Saturday, April 12, 2014
Pan Seared Walleye with Balsamic Glazed Roasted Cherry Tomatoes


We threw back more than we kept. At the end of the day, I came back with a nice stringer of walleye and white bass, more than enough for one person to eat. Now that I have all this fish in my freezer, along with all the fish Ricks cousins like to give me when I go to visit them, its often a challenge to think of new ways to cook it. I dont know why, but Im not as creative with fish as I am with red meat.

So here is a quick, but different way to cook walleye. The roasted cherry tomatoes add a sweet and refreshing element to the dish, while pan searing the fish in butter gives it a beautiful golden color. I hope you give this a try. Enjoy!
Servings: 4
Prep Time: 5 minutes
Cooking Time: 20-30 minutes
Ingredients:
- 4 walleye fillets
- salt and freshly cracked black pepper, to taste
- 2-3 tbs. of butter
- 1 package of cherry tomatoes, halved
- 3 cloves of garlic, minced
- 1 tbs. of olive oil
- splash of balsamic vinegar
- 2 tbs. of brown sugar, packed
- pinch of dried thyme (fresh is better if you have it... same goes for basil)
- pinch of dried basil
- red pepper flakes, to taste (optional)
- lemon wedges, for garnish

In a baking dish or rimmed cookie sheet, combine tomatoes, garlic, olive oil, balsamic vinegar, brown sugar, thyme, basil, red pepper flakes, and salt and pepper to taste. Bake in a 375 degree oven for about 20 minutes, or until tomatoes start to caramelize.


Do not overcrowd pan.

Serve fish with your favorite side dishes and garnish with lemon wedges. Spoon roasted tomatoes and its juices over the fish. Serve immediately.
Friday, April 11, 2014
Holiday Gift Guide Hostess with Mostess

Monday, April 7, 2014
Chao Shanghai Cai Stir fried Shanghai Bok Choi with garlic

There is some confusion about what to call various greens in the Chinese repertoire. Bok choi, means white vegetable in Cantonese, and generally refers to the larger white cabbages (pekinensis cultivar group) which in the West are recognized as napa cabbage; in Beijing, the mandarin equivalent is bai cai, and when in season, you’ll see enormous piles of these big cabbages on neighborhood streets, awaiting distribution to homes and restaurants for preserving, boiling and stir frying (The Beijing authorities nearly eliminated this "unsightly" practice during the 2008 Olympics). However, the popular name for the vegetable in this dish is Shanghai Bok Choi which is not even remotely large or entirely white. In fact, Chinese cooks enjoy the very small leaves of this cabbage, the smaller the better. Again, the preparation is extremely simple, featuring the superb texture and flavor of this delicious, healthy vegetable.
1 lb Shanghai bok choi, or Shanghai Choi, trimmedWash and thoroughly dry the cabbage. Trim the base from each cabbage head so that all of the leaves separate.
3 med garlic cloves, minced
1/3 tsp kosher salt (or, if you prefer, 1 Tab light soy sauce)
2 – 3 Tab peanut oil
Sesame oil
Prepare other ingredients.
Heat wok to medium, add peanut oil and when it is hot, toss in garlic. Stir fry quickly for 5 or 10 seconds, add Shanghai bok choi, stir fry for one minute or so and add salt (or soy if you prefer). Cover, turn heat down to low medium, and allow cabbage to steam in its own juices for 2 minutes or so, or until the leaves are limp and the stalks begin to shrink and soften. Adjust saltiness if necessary. Plate the Shanghai choi on a platter and garnish with sesame oil.
Sunday, April 6, 2014
Egg Biryani with tangy twist

Ingredients:
Eggs-2
Onions-chopped-1cup
Tomatos-chopped-1cup
Green peas-1/4cup
Green chilles 2
Mint leaves-1/4cup
Bay lef 1
cinnamon 1 inch stick
Cardamom 2 pods
chopped ciliantro 2t.s
Cumin seeds 1tbsp
Mustard seeds 1tbsp
Chana dal 1/4ts
Urad dal-1/4ts
Turmeric Pinch
Salt To taste
Chilli powder 1/2t.s
Coriander powder-1/2ts
Cumin powder-1/2ts
Garam masala-1/4ts (optional)
Red chilli 1tbsp
vegetable oil 2tbsp
Tamarind-lemon size
Method
- Boil Eggs and remove shell, keep them aside.
- Heat a thick bottom non stick pan and add 2ts of vegetable oil.
- Add Cumin seeds + Mustard Seeds + Red chili + chana Dal + Urad dal and wait until they splutter.
- Add cinnamon+cardamom+bayleaf+ onions + green chilies and saute until they get half cooked. Mean while soak tamarind in water.
- Add tomatos and cook under medium flame until they get cooked completely.
- Squeeze out tamarind water from the soaked tamarind and add this water to the cooking mixture.
- Add all curry powders chili powder+salt+coriander powder+cumin powder+green peas+mint leaves and cook for 5min under medium flame.
- Add water and bring to boil.
- Add garam masala at the if you prefer it spicy.
- Add rice and cook like a normal rice.
- When the rice is about to cook take the boiled eggs and make slit with knife on the top and place them inside the rice and cook under low flame.
- Finally garnish with cilantro.
cheers
DD
Friday, April 4, 2014
Slow Cooked Pulled Pork with Sweet and Sour Cole Slaw and Chipotle Sauce

Monday, March 31, 2014
Green Bean Sweet Onion Cherry Tomato Salad with Parsley Mint Dressing
As for the dressing, parsley is said to be good for counteracting bad breath from eating raw onions.And if it doesnt work, well, never mind, it makes a nice fresh and sprightly dressing. This would be good over cucumbers instead, or any tossed green salad for that matter.
4 to 6 servings
30 minutes prep time - allow 30 minutes rest time

Make the Dressing:
1/4 cup packed parsley
2 tablespoons packed mint leaves
1/4 teaspoon salt
1/8 teaspoon freshly ground black pepper
1 teaspoon sugar
1/3 cup mayonnaise (light is fine)
the juice of 1/2 lemon
Wash and drain the parsley and mint well. Put them in the bowl of a food processor, and add the salt, pepper, and sugar. Process until finely chopped. Add the mayonnaise and lemon juice, and process again, until well blended. Remove to a serving container, and keep refrigerated until wanted.
Make the Salad:
500 grams (1 pound) green beans
1 medium sweet onion
2 cups cherry tomatoes
salt
Wash and trim the green beans, and cut them into bite-sized pieces. Cook them in boiling water until just tender, about 4 to 6 minutes. Rinse in cold water and drain well.
Meanwhile, Peel the onion and cut it in half from top to bottom. Cut each half into thin slices, as thin as possible. Spread them out on a plate and sprinkle them generously with salt. Set aside for about half an hour.
Wash and destem the cherry tomatoes, and cut them in halves if you feel they are large enough to warrant it.
To serve the salad, arrange the well-drained beans on a serving plate. Rinse the onions in cold water and drain them well. Arrange them over the beans, along with the cherry tomatoes. Drizzle the salad dressing over the salad, or pass it on the side.
Last year at this time I made Balsamic Beans.
Friday, March 28, 2014
angel hair pasta with chicken
2 boneless,skinless chicken breasts
1 carrot, sliced diagonally
1 pkg frozen brocoli
2 cloves garlic, minced
12 oz angel hair pasta
2/3 c. chicken broth
1 tsp. dried basil
1/4 c. grated parmesan or motzerella cheese
Cook chicken in 1. Tbsp oil then remove from skillet. Heat remaining oil. Add carrot to skillet, cook 4 min. Add brocolli and garlic. Cook 2 min longer. To skilllet, add chicken broth, basil and cheese. Return to skillet. Reduce heat and simmer 5 min. place over cooked pasta....enjoy!
RECIPE BY KARLA

p.s. my toddler LOVED this!
Tuesday, March 25, 2014
Punugulu Urad Dal Bondas with Dosa Batter
Punugulu are very popular Andhra Snack which can be enjoyed in the cold evenings with a cup of tea. This snack is very simple and will be ready in no time if dosa batter is available in home.


- Mix all the above ingredients well.
- Keep aside for 15mins.
- Heat oil in a deep frying pan.
- Once the oil gets heated, reduce the flame to medium.
- Take small portion of batter and drop small balls into the hot oil.
- Place 8-10 punugulu in one go. And cook them on medium flame by turning them in between.
- Cook them till golden brown/till it turns its color.
- Remove them onto a absorbent paper. Serve with chutney.

Thursday, March 20, 2014
Baked Halva with Carrots Güveçte Havuçlu Helva


Sunday, March 16, 2014
Anasazi Beans With Juniper Berries

Note: 1. You can find juniper berries in the spice section of food
markets. 2. Soaking beans overnight gets rid of about 70 percent of
the gases. Also be sure to drain off the water that you soak the
beans in and rinse well. Then cook with fresh water.
2 C. dried Anasazi beans
10 coriander seeds
8 juniper berries
1 sm. onion
1 T. sunflower seed or light olive oil
1 tsp. ground red chile (opt)
1 tsp. dried Mexican oregano
2 1/2 qt. water
salt
Sort through the beans, rinse them well, cover them with cold water,
and set them aside for six hours or overnight.
Bruise the seeds and berries in a mortar, and chop the onion into
small squares.
Warm the oil in a wide-bottomed soup pot; add the onions, coriander
seeds, juniper berries, chile and oregano. Cook together over medium
heat for 3 or 4 minutes, stirring occasionally.
Drain the beans and add them to the pot along with the fresh water.
Bring to a boil; then lower the heat and simmer for 40 minutes. Add
salt to taste and continue cooking until the beans are as tender as
you like them ~ probably another 30 minutes or so. When done, check
the seasoning. Serve the beans in a bowl with the broth.
Suggestion: There are lots of tasty additions you can use - cilantro,
mint, scallions, sour cream, cheese and so on. But try the beans
plain first.
Nutritional analysis per serving: 401 calories, 4.84 grams fat, 0
milligrams cholesterol, 27.6 milligrams sodium; 11 percent of
calories form fat.
from: The Savory Way.
Contributor: Burning Tree Native Grill
Yield: 1 recipe
Friday, March 7, 2014
WHOLE WHEAT TORTILLA PIZZA WITH CILANTRO PESTO

This is my entry for the "Weekend Herb Blogging Event" started by Kalyn from http://kalynskitchen./, hosted this week by Srivalli from "Cooking 4 all seasons". I have chosen cilantro as the herb in the dish. Though a common herb used everyday in most kitchen, I was amazed by the benefits of cilantro when I searched the web. Here are a few benefits of cilantro:
· A great source of iron and magnesium, which women should get a good supply daily
· Rich in phytonutrients and flavonoids, which helps protect against disease
· Lowers bad cholesterol (LDL) and raises good cholesterol (HDL)
· Is an anti-inflammatory that may alleviate symptoms of arthritis
Who knew that the humble cilantro had so many good characteristics? This is a healthy recipe too since I have used whole wheat tortilla as the pizza base and low-fat cheeses. A healthy and tasty way to enjoy pizza with less fat than the regular pizza.
FOR THE CILANTRO PESTO:
INGREDIENTS:
Cilantro, 1 big bunch.
Cashews, ¼ cup.
Grated parmesan cheese, 2 tablespoons.
Garlic, 1 clove.
Salt as per taste.
Pepper, ¼ teaspoon.
Extra-virgin olive oil, ¼ cup.
PREPARATION:
This is a raw sauce, so extra-virgin olive oil is the best choice. The only difference of this sauce from a regular pesto sauce is that I have used cashews instead of pine nuts. The silkiness of the cashews goes very well with the cilantro in this case. It adds a good flavor to the sauce. Remove the leaves of the cilantro from the stems, wash them, and drain them. Take a blender and put the cilantro leaves along with ¼ cup cashews, 1 clove of garlic and give a few pulses until everything is ground coarsely. Add salt, pepper, grated parmesan cheese to the mixture. Then add the olive oil slowly and start blending everything together until a smooth paste is obtained. This pesto sauce can be stored in the fridge for up to 1 week. It can also be used for pastas.
FOR THE PIZZA:
INGREDIENTS:
Whole wheat tortilla wrap, 1.
Vegetables like bell peppers, mushrooms, carrots, red onions, everything coming to about 2 cups.
Baby spinach leaves, ½ cup.
Combination of grated cheeses like fontina and mozzarella coming to about 1 cup together.
Red chili flakes, 1 teaspoon, (optional).
Parmesan cheese, 1 tablespoon.
PREPARATION:
Take a tortilla wrap and rub a little oil on both sides. Place the wrap on a baking plate and bake it at 350 degrees for 10 minutes. Meanwhile cut the vegetables into long thin slices and keep them aside. After 10 minutes, take the plate from the oven. Apply the cilantro pesto on one side of the wrap. Then arrange the vegetable slices and baby spinach leaves all over the wrap. Cover it with grated fontina and mozzarella cheese. Sprinkle grated parmesan cheese and chili flakes if needed all over the top. Bake it for another 5-10 minutes at 350 degrees until the cheeses turn bubbly. Remove the pizza from the oven and cut it big slices and serve.
Monday, March 3, 2014
SANDRAS GRILLED RACK of LAMB with a HONEY BALSAMIC SAUCE
 |
| I love to serve these lamb chops with garlicy smashed potatoes and salad drizzled with light vinaigrette... |
Prep: 6 mins. |
Grill: 20 to 24 mins.
INGREDIENTS
1/3 cup balsamic vinegar
1 garlic clove, chopped
2 tablespoons honey
1/2 cup fresh parsley leaves
3/4 cup vegetable oil
1 rack of lamb (with 8 chops intact), I have the butcher French the bone ends
2 tablespoons olive oil
Kosher salt and freshly ground black pepper, to taste
1 tablespoon fresh rosemary, finely chopped (or 1 teaspoon dried)
METHOD
Place a grill pan over medium-high heat or preheat a gas or charcoal grill, and oil the grates.
In a food processor, combine the balsamic vinegar, garlic, honey, and parsley. Pulse until blended. With the processor running, slowly drizzle in the vegetable oil until the mixture emulsifies. Season with salt and pepper, to taste, and set aside; dividing sauce equally into two small bowls.
Brush the rack of lamb with olive oil, and sprinkle with kosher salt, ground pepper, and rosemary. Lightly cover the exposed bones with tin foil to prevent burning while grilling. Cook, covered, for 10 to 12 minutes fat side up on grill, and turn with tongs, and continue cooking, covered, for another 10 to 12 minutes, or until meat registers 135 to 140 degrees for medium. Remove rack of lamb and tent with foil, and let the meat stand for 5 minutes before cutting into individual chops.
Cut the rack of lamb into chops, and arrange decoratively on a platter. Spoon half of the reserved sauce over top of chops; plus serve extra sauce on the side for dipping. Enjoy!
~~~~~~~~~~~~~~~~~~~~~~
Tip: For roasting in oven, preheat oven to 425 degrees. Prepare and season racks of lamb as directed. Place on foil-lined baking sheet fat side up. Roast for 20 to 24 minutes, just until meat registers 135 to 140 degrees for medium. Transfer the rack of lamb to a cutting board, and tent with foil and let stand 5 minutes before cutting.
Sunday, March 2, 2014
Roasted Asparagus with Fried Prosciutto and Poached Egg – Never Say Never Cook Prosciutto
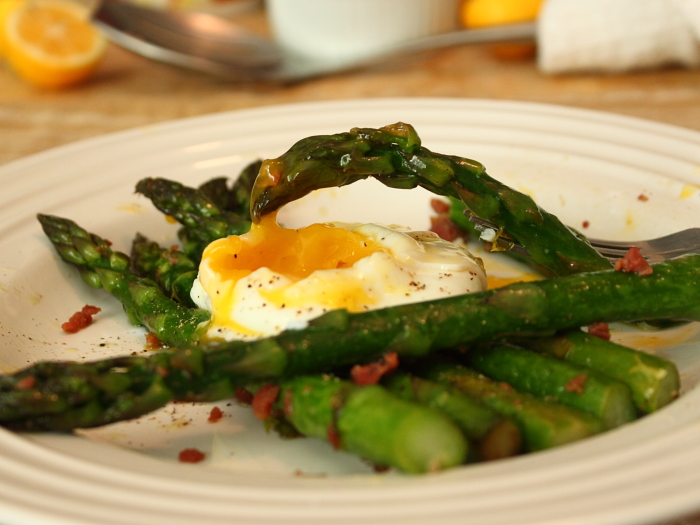

View the complete recipe
Wednesday, February 26, 2014
Lemon Infused Gluten Free Pasta Salad with Grilled Asparagus and Herbs
 |
| A light, lemony vegan pasta salad. Gluten-free. |
Lemon Pasta Salad for Summer
To speak about something as prosaic as pasta salad seems downright ho-hum. I mean. It's just a pasta salad. It's something I tossed together with stuff I had on hand. I hadn't planned on it. I didn't spend days contemplating the ins and outs and quirks of gluten-free brown rice penne. In fact, if I'm being unabashedly honest here I rarely think about food at all.
Until I'm hungry.
Until those familiar, nagging pangs begin gnawing their pesky little way into my consciousness, distracting me from my preferred, visual nomenclature- which rarely includes anything edible.
I daydream about paint, the plight of bees, and Clint Mansell's score for Moon. I notice the temperature of light and the curve of negative space against a jar of old spoons. I think about expectations and illusions and perceptions. I ponder where my soul is taking me, tugging at me to pay attention to my life, inviting me through dreams and the random snippets of music or ideas or theories that skitter and skate and ripple the mental stream I wade in day after day, to consider time itself- if I believe in it- sliding by in a cool constant flow of now.
I rarely eat breakfast. I often forget lunch. And dinner time always surprises me. As if each day takes figuring out all over again how to live (to paraphrase the Deadwood Zen master David Milch).
This doesn't mean I don't appreciate good food. Or that I hate to cook (well, some days I am less than enthusiastic). I loathe junk food and processed food. I can't take credit for this- it's simply the way I'm built, the way my body so pointedly rejects any easy, packaged fix.
Even before I discovered gluten intolerance and FODMAPs I knew on some instinctual level that in order to keep this body of mine healthy and strong for the here and now I have to pay it some attention. I know I have to eat. And eat consciously.
And so I find myself rummaging in the little white painted cupboard that is my pantry.
And I find a box of brown rice penne.
In the fridge I locate a fistful of spring asparagus.
One lemon.
A few sprigs of dill, marjoram, parsley and mint.
The rest is history.
Now in my belly.
Fuel for instigating thoughts of rebirth, fragility, and the particular pink that is ranunculus.
Read more + get the recipe >>